In this text, you will see how within Elementor, you can create slide out boxes with the help of simple CSS code that can be applied to any type of content.
The first thing to do is to create a nested section by dragging the columns into the current section and styling the background. Under option Advanced we'll add some space to the top and bottom of the a section under the option Style we will insert some image for the background, where we will also for Position set attribute Center Center, code Repeat we will set No-repeat and at Size we will set Cover.

Within the section we see that a column has been created and within it there is a nested section. With the nested section, we will delete one column that we do not need, and we will style the rest. Under option Advanced we'll add a space, then a sub Style we will stylize it by adding color and rounding its ends under the option Border and so we got the first section. Then we'll add a title to it and insert some text.
The next thing we're going to do is copy the section and we're going to modify it a bit to differentiate them, by deleting some text, adding a button, whatever you can think of. So we got 2 different sections and now we need to implement some CSS classes with which we can change the style of the sections using specific CSS code. The first thing to do is to add a CSS class to all sections by clicking on the section and under the option Advanced find the field CSS Classes and enter the name of the class we want.

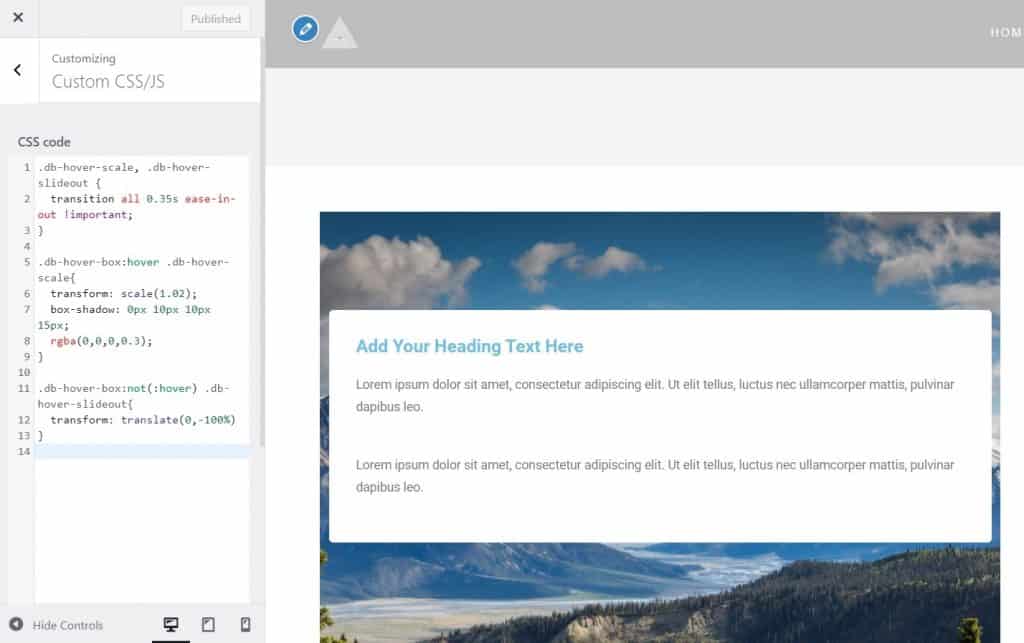
After we have done the above, we need to save it and start adding the CSS code. It can be entered in several different places, in several sections, but it is best to enter it in the theme, so that we can use it globally and we will do it under the option Customize, within which you will find Custom CSS/JS as in the picture below.

A floor is needed Custom CSS/JS type the specific code, based on the CSS classes of the sections we used. Be careful when giving class names to those sections, so you don't end up with something that doesn't work well when you type the CSS code. The CSS code is shown in the following image, within which are db-hover-scale, db-hover-box and db-hover-slideout class names, if you named them differently use your own names.

When you have typed the CSS code, see how the next section should look like, initially the upper section will be covered by the lower one, in order to solve this, for the upper one to cover the lower one, you need to modify the page with Elementor. You will solve this by modifying the above section Z-index under option Advanced and give it a value of 1. That way the top section covers the bottom one as in the image above, and in the next image you will see what is displayed when you mouse over the sections.

With a fairly simple CSS code, you've got a nice and creative section layout. I hope that this text was useful for you and that you learned something new, if you are interested in reading more tips for independent work, you can check them out on our blog, and in case you want to consult with professionals, click on this one Link.
Source: youtube


